I had been thinking about adding a search tool to this site for a while now. In fact, I had a bitbucket issue created back in October 2018 about it! Today, I installed Algolia on the site, and am pushing the content to be indexed via Bitbucket Pipelines.
During my research into a new search tool for the University of Northern Colorado, I came across Algolia. They were not a good use case for us because they don’t include a crawler. You needed to bring your content to them and they would provide the search results. While I was searching for Jekyll search plugins, the Algolia Jekyll Plugin came up. Algolia offers a free community version of their search, so I decided to try it out. You can test it out over on the Search page.
Sign up for an Algolia account
First, go to Algolia and set up a free trial account. Once logged in, navigate to the Billing page and change your plan to “community”. With this plan, you can index 10,000 pieces of content and perform 50,000 additions/deletions. The searching of content is free! Next, navigate to API Keys and copy down the Application ID and the Admin API Key.
Install the Algolia Jekyll-Gem
This is going to be super simple, and will only cover the basics. In your Gemfile add the GEM under the plugins section:
# If you have any plugins, put them here!
group :jekyll_plugins do
  gem 'jekyll-algolia', '~> 1.0'
end
Now run bundle install to install the GEM.
In your _config.yml file, you will need to add some information about what content you want to be searched. I placed this at the bottom of my _config.yml file.
# Search Settings:
algolia:
  application_id: 'K4FTLR7DQW'
  index_name: 'prod_developerjesse'
The application_id was provided in the API keys page and the index_name is the name you wish to name the collection of pages. You can set this up ahead of time, or it will be created if there isn’t one the first time you publish.
Publish your content to Algolia Manually
To manually push your content to Algolia you need to save the Admin API Key in one of two places.
1) save it as an Environment Variable named ALGOLIA_API_KEY
2) create a file called _algolia_api_key and save it there. If you do this, also add this file to your .gitignore file. This API key should not be saved in the repo.
Finally, manually push your content to Algolia with this command:
bundle exec jekyll algolia
If successful, navigate to the Algolia Dashboard to see your new collection.
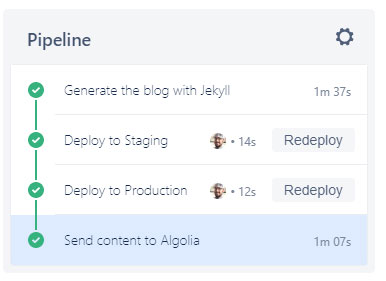
Automatically push your content Via Bitbucket Pipelines
Having Bitbucket perform this step is quite easy. First, under Pipelines/Repository Variables, create a new Variable named ALGOLIA_API_KEY. You can check the secure box for it as it should not be public information.

Next, you will need to modify your pipelines file to push the content. I created a new (automatic) step for this since I have Pipelines taking care of a few different things.
First, it needs access to bundler, which is under the caches section. In the script, it first installs the dependencies, and second, uses the above command to push the content. I have this step set to automatic after the content is pushed to production.
If there is interest, send me an email, and I can write up a post about the other steps in the pipeline.
 The Meetings Are the Work
 Writing Code Was the Easy Part
The speedup is real. It's just smaller than the marketing.
Writing Code Was the Easy Part
The speedup is real. It's just smaller than the marketing.
 I Give Advice 75% of the Time. I'm Trying to Get to 50.