The original goal of this blog post was to discuss upgrading contracts with a Gnosis Safe multisignature wallet. But as I wrote the post, it became too long and started in the middle of the story, so I have split into two. This is the first part…
Upgradable smart contracts
We released the next version of the RootstockCollective DAO this past week and as part of that, we upgraded the stRIF smart contract. This contract is an ERC20 token that allows users to vote in the DAO governance. This contract holds the equal amount of RIF which at the time of writing is a little over a million dollars worth. The contract is an upgradable contract so we could make changes in the future, but given the amount of value it has locked it in, it is important that it has safeguards in place so it can’t get upgraded by mistake or a bad actor.
In this two-part series, I will discuss how to deploy an upgradable contract with Hardhat and and then we will upgrade it. The first post will discuss the deployment and initial upgrade with Hardhat, and then in the second post, we will transfer ownership to a Gnosis Safe to handle the upgrade.
Let’s get started!
Setup our deployment environment
Create a new Hardhat project and go through the setup. Then we will need to add a few extra dependecies
npx hardhat init
npm add dotenv @openzeppelin/contracts-upgradeable @openzeppelin/hardhat-upgrades
contracts/NumberKeeper.sol
We will use a simple contract since we are focusing on the upgrade functionality. This is our simple NumberKeeper contract that we used a variation of in the DAO Delegation post.
// SPDX-License-Identifier: MIT
pragma solidity ^0.8.0;

import "@openzeppelin/contracts-upgradeable/proxy/utils/Initializable.sol";
import "@openzeppelin/contracts-upgradeable/access/OwnableUpgradeable.sol";

contract NumberKeeper is Initializable, OwnableUpgradeable {
    uint256 public number;

    function initialize(uint256 _initialNumber) public initializer {
        __Ownable_init(msg.sender);
        number = _initialNumber;
    }

    function version() public pure returns(uint256) {
        return 1;
    }
}
In this script we have two major differences which are the libraries it is inheriting. The OwnableUpgradeable allows us to upgrade the contract and have it assigned to an address.
The second is the Initializable library. In standard (non-upgradable) contracts, constructors are used to initialize the contract’s state at deployment. However, in upgradable contracts that utilize a proxy pattern, constructors behave differently due to the separation of logic and storage. This topic could use its own blog post in the future if there is enough interest.
hardhat.config.ts
In this tutorial we will be deploying to Rootstock Testnet which we will need to add to our hardhat configuration file. We will also be verifying the contract on Blockscout. I use the gist below quite a bit when starting new projects for Rootstock.
import { HardhatUserConfig } from "hardhat/config";
import "@nomicfoundation/hardhat-toolbox";
import { HttpNetworkHDAccountsConfig } from "hardhat/types";
import dotenv from 'dotenv';
import '@openzeppelin/hardhat-upgrades';

dotenv.config();

const derivationPath = "m/44'/60'/0'/0";
const accounts = {
  mnemonic: process.env.MNEMONIC ?? '',
  path: derivationPath,
} satisfies Partial<HttpNetworkHDAccountsConfig>;


const config: HardhatUserConfig = {
  solidity: '0.8.27',
  networks: {
    rootstockTestnet: {
      chainId: 31,
      url: 'https://public-node.testnet.rsk.co/',
      accounts,
    },
  },
  etherscan: {
    apiKey: {
      rootstockTestnet: 'RSK_TESTNET_RPC_URL',
    },
    customChains: [
      {
        network: 'rootstockTestnet',
        chainId: 31,
        urls: {
          apiURL: 'https://rootstock-testnet.blockscout.com/api/',
          browserURL: 'https://rootstock-testnet.blockscout.com/',
        },
      },
    ]
  }
};

export default config;
Notice that line 11 expects a mnemonic, process.env.MNEMONIC, so we will create a new file called .env with our mnemonic. The script above uses the standard Ethereum derivation path so make sure there is enough gas at that address to cover the deploy action cost.
scripts/deploy.js
We need to create a simple deploy script that will deploy to the blockchain:
const { ethers, upgrades } = require('hardhat');

async function main() {
  const NumberKeeper = await ethers.getContractFactory('NumberKeeper');
  const myContract = await upgrades.deployProxy(NumberKeeper, [0], { initializer: 'initialize' });
  // Wait for the contract to be deployed
  await myContract.waitForDeployment();

  // Get the contract address
  const address = await myContract.getAddress();

  console.log('NumberKeeper deployed to:', address);
}

main()
  .then(() => process.exit(0))
  .catch((error) => {
    console.error('Error deploying contract:', error);
    process.exit(1);
  });
Deploy and Verify our initial V1 Contract
With the setup complete, we are ready to deploy the contract to the Rootstock testnet. Using hardhat, compile the contracts and run the deply script:
npx hardhat compile
npx hardhat run scripts/deploy.js --network rootstockTestnet

NumberKeeper deployed to: 0x624a85DBcc2C514A22Afa53450E98B9f9eb22371
The address there is the proxy address, which will always be the same. The implementaion address is the one we will upgrade. We can see this on the Blockscout explorer.
Blockscout will automatically verify the proxy contract since we are using the OpenZepplin library. We need to verify the implementation contract, we can see the address in Blockscout.
npx hardhat verify 0xA60172F1e99B17A673523d02E711365bE23e87cF --network rootstockTestnet
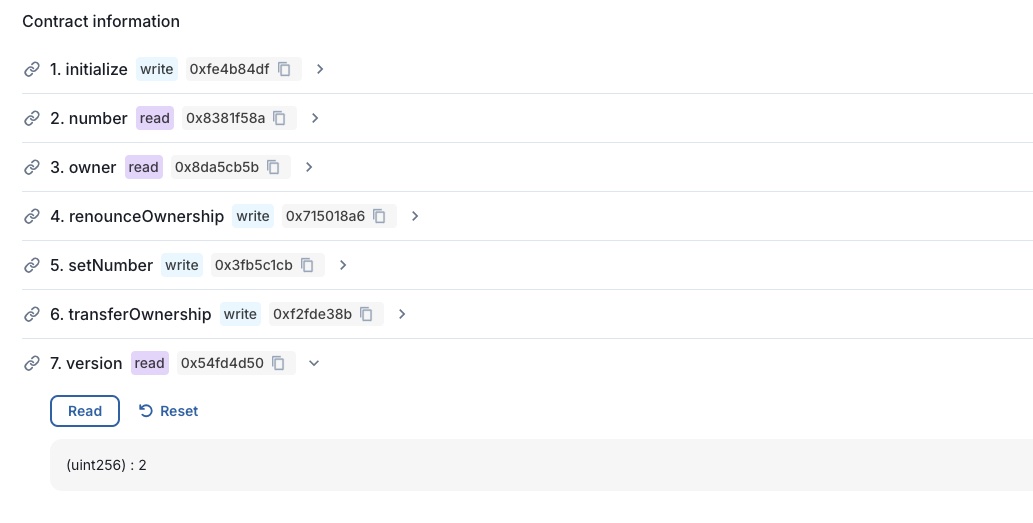
In Blockscout, under “Contract” and “Read/Write Proxy” we can call the version method, and verify it is 1.

NumberKeeper, version 2
It is best practice to make a copy of the solidity contract and call it v2 in the repo. For git, it would be best to commit the new file before you make changes that way a developer can see what has been changed. In this change we will also change the name of the contract to append V2.
For version 2, let’s add a method to our contract that allows someone to change the number and increment the version number.
// SPDX-License-Identifier: MIT
pragma solidity ^0.8.0;

import "@openzeppelin/contracts-upgradeable/proxy/utils/Initializable.sol";
import "@openzeppelin/contracts-upgradeable/access/OwnableUpgradeable.sol";

contract NumberKeeperV2 is Initializable, OwnableUpgradeable {
    uint256 public number;

    function initialize(uint256 _initialNumber) public initializer {
        __Ownable_init(msg.sender);
        number = _initialNumber;
    }

    function setNumber(uint256 _newNumber) public {
      number = _newNumber;
    }

    function version() public pure returns(uint256) {
        return 2;
    }
}
Deploy and verify version 2
Create a new deploy script called upgradeV2.js in our scripts folder, with the code below. Change line 4 to the address of your proxy contract!
const { ethers, upgrades } = require('hardhat');

async function main() {
  const proxyAddress = '0x624a85DbCC2c514A22AfA53450e98B9f9eb22371'.toLowerCase()

  const contractV2 = await ethers.getContractFactory('NumberKeeperV2');

  // Validate that the upgrade is safe
  await upgrades.validateUpgrade(proxyAddress, contractV2);

  const upgraded = await upgrades.upgradeProxy(proxyAddress, contractV2);

  await upgraded.waitForDeployment();

  const address = await upgraded.getAddress();
  console.log('Contract upgraded at:', address);

  // Optional: Verify new functionality
  const version = await upgraded.version();
  console.log('Current version:', version.toString());
}

main()
  .then(() => process.exit(0))
  .catch((error) => {
    console.error('Error upgrading contract:', error);
    process.exit(1);
  });
Let’s run the upgrade:
npx hardhat run scripts/upgradeV2.js --network rootstockTestnet
Contract upgraded at: 0x624a85dbcc2c514a22afa53450e98b9f9eb22371
Current version: 2
Verify the new implementation contract
In Blockscout we can see that the new implementation contract is located here. It can be verified on Blockscout similar to the V1 contract:
npx hardhat verify 0x2AbC91527ee8E0f9D929995512c3Db588Cc70a7b --network rootstockTestnet
Test it
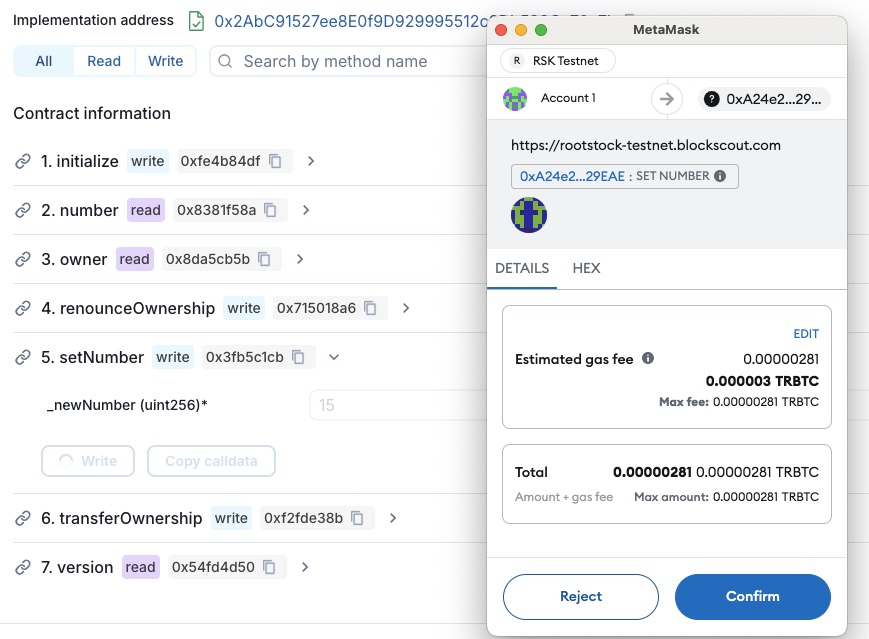
In Blockscout, execute the version() method and we can see it is set to 2. We can also run the setNumber() method to change it.

Using Blockscout’s explorer we can also set the number to a new number, a feature we added in Version 2:

What’s next?
In this quick post we created and deployed an upgradable contract, and then upgraded it to add additional features. In the next post we will perform the smart contract upgrade with a Gnosis Safe account.
 20 Years of Dreamweaver, and One Long Overdue Migration
 AlertMe - Farcaster Reminder Bot
 A Developer's Guide to Storytelling
How to make your technical work matter to people who don't speak code