In the previous post, we discussed upgradable smart contracts with Hardhat. In that example, the developer who deployed the initial contract and the upgrade was responsible for updating the proxy to point to the new implementation address.
In this post, we will delegate that responsibility to a Gnosis Safe with multiple signers to handle the contract upgrade. This approach is similar to the setup used by the Rootstock Collective DAO.
The Setup
We will continue using the contract from the previous post, but I’ll deploy it to a different address so that each post can stand alone. For this post, here are the addresses we will be using:
- Proxy contract: 0xe7BEBa7A8e5418b6E32D079b650e17B69b0B524E
To recap the previous post, version 1 was deployed and then upgraded to version 2.
Let’s get started.
Creating a Gnosis Safe
Creating and interacting with a Gnosis Safe could be a post on its own, so I won’t go into too much detail here.
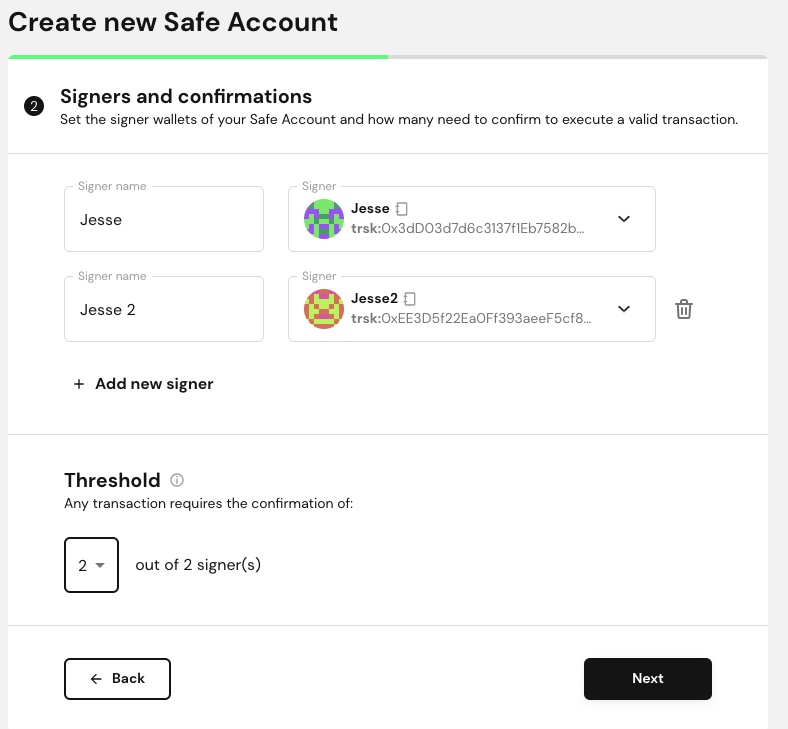
Navigate to safe.rootstock.io to create a new Gnosis Safe. For simplicity in this post, the safe will have two owners and require both of them to sign a transaction to proceed. In the actual safe for the Rootstock Collective, we have multiple signers and require at least three of them to sign.
After giving your safe a name, the next screen will ask for the signers’ addresses and the threshold, which is the number of signers required to execute a transaction.
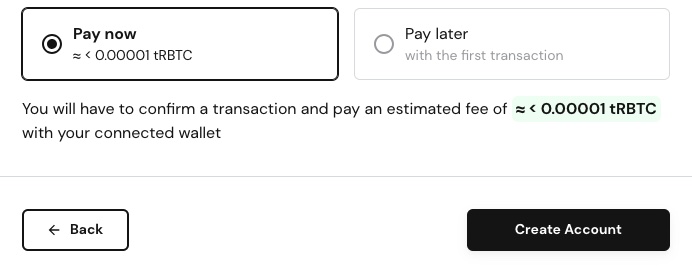
On the next screen, confirm that the information is correct, then select “Pay now” to create the Safe. This action will deploy the Safe smart contract to the network.
With our Safe created, we now have its address. This address will become the owner of the NumberKeeper contract.
Transfer Ownership of the ProxyAdmin Contract
The next step is to transfer ownership of the ProxyAdmin contract to the Gnosis Safe address. The ProxyAdmin contract manages ownership in the TransparentUpgradeableProxy pattern that we are using.
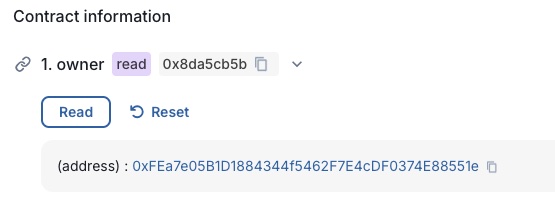
The Safe we are using has the address 0xfea7e05b1d1884344f5462f7e4cdf0374e88551e. We will need a small script to interact with the contract and set the address:
// scripts/transfer-ownership.js
const { ethers, upgrades } = require("hardhat");

async function main() {
  const gnosisSafeAddress = '0xfea7e05b1d1884344f5462f7e4cdf0374e88551e'.toLowerCase()
  const proxyAdminAddress = '0x58CAf3C28528DF0654b00bb2807F35Eb03308135'.toLowerCase()

  const PROXY_ADMIN_ABI = [
    "function owner() view returns (address)",
    "function transferOwnership(address newOwner)",
  ];

  const proxyAdmin = await ethers.getContractAt(PROXY_ADMIN_ABI, proxyAdminAddress)

  const tx = await proxyAdmin.transferOwnership(gnosisSafeAddress)

  await tx.wait()

  const newOwner = await proxyContract.owner()
  console.log('New Owner:', newOwner)
}

main()
  .then(() => process.exit(0))
  .catch((error) => {
    console.error('Error upgrading contract:', error);
    process.exit(1);
  });
The owner of the ProxyAdmin contract is now set to the Gnosis Safe. This can be confirmed using Blockscout’s Contract Interaction tab:
Next, let’s proceed with updating the implementation contract.
NumberKeeperV3
Similar to the previous post, we will create a copy of the contract file called NumberKeeperV3.sol. In this version, we’ll add a new method, subtractBy(), and increment the version number. The full contract now looks like this:
// SPDX-License-Identifier: MIT
pragma solidity ^0.8.0;

import "@openzeppelin/contracts-upgradeable/proxy/utils/Initializable.sol";
import "@openzeppelin/contracts-upgradeable/access/OwnableUpgradeable.sol";

contract NumberKeeperV3 is Initializable, OwnableUpgradeable {
    uint256 public number;

    function initialize(uint256 _initialNumber) public initializer {
        __Ownable_init(msg.sender);
        number = _initialNumber;
    }

    function setNumber(uint256 _newNumber) public {
      number = _newNumber;
    }

    function subtractBy(uint256 _amount) public {
      number = number - _amount;
    }

    function version() public pure returns(uint256) {
        return 3;
    }
}
Deploy the Implementation Contract
Since our account no longer has permissions to upgrade the proxy contract, we will only deploy the new implementation. To do this, we will use a modified version of our deploy script:
const { ethers } = require("hardhat")
const { Interface } = require("ethers")

async function main() {
  // Deploy the V3 Implementation contract:
  const NumberKeeperV3 = await ethers.getContractFactory("NumberKeeperV3")
  const numberKeeperV3Impl = await NumberKeeperV3.deploy()
  await numberKeeperV3Impl.waitForDeployment()

  // Retrieve the implementation address:
  const implementationAddress = await numberKeeperV3Impl.getAddress()
  console.log("NumberKeeperV3 implementation deployed at:", implementationAddress)
}

main()
  .then(() => process.exit(0))
  .catch(error => {
    console.error(error);
    process.exit(1);
  });
The output of that script is the following:
> npx hardhat run scripts/deployV3.js --network rootstockTestnet
NumberKeeperV3 implementation deployed at: 0xd9c3CE743B2A343bdBecD8aC1Ba0f0e709f3Dc3D
Let’s verify the new implementation on the explorer:
npx hardhat verify 0xd9c3CE743B2A343bdBecD8aC1Ba0f0e709f3Dc3D --network rootstockTestnet
Confirm in the block explorer that NumberKeeperV3 is verified.
Upgrading the Contract with Gnosis Safe
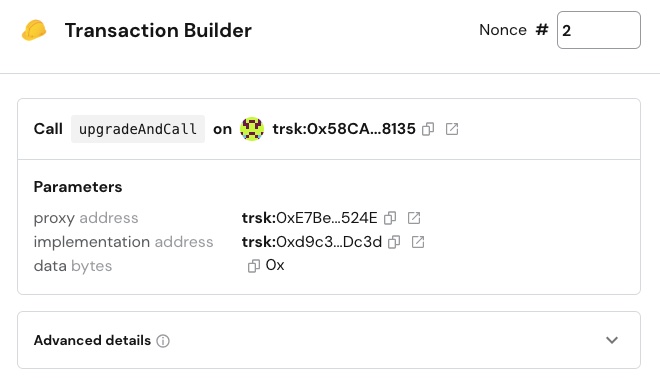
It is finally time to upgrade our contract. Head over to Gnosis Safe, and on the dashboard, you will see the “Transaction Builder” app. This app will help us construct the transaction that will be signed later.
Under “Address,” enter the proxy address, and under “ABI,” provide the ABI for the upgrade() method. While you could include the entire ABI, it is unnecessary; we only need the method we are going to call.
Start with the “Enter Address” field — the ProxyAdmin address: 0x58CAf3C28528DF0654b00bb2807F35Eb03308135
Next, enter the ABI:
[
  {
    "inputs": [
      {
        "internalType": "address",
        "name": "proxy",
        "type": "address"
      },
      {
        "internalType": "address",
        "name": "implementation",
        "type": "address"
      },
      {
        "internalType": "bytes",
        "name": "data",
        "type": "bytes"
      }
    ],
    "name": "upgradeAndCall",
    "outputs": [],
    "stateMutability": "payable",
    "type": "function"
  }
]
After pasting in the ABI, additional form fields will appear below:
- “To Address”: This will populate with the address above, the ProxyAdmin.
- “tRBTC value”: Set to
0, as we are not sending any funds. - “Method Selector”: Choose
upgradeAndCall, as we are calling the upgrade method on the contract. - “Proxy (address)”: Enter the contract proxy address,
0xe7BEBa7A8e5418b6E32D079b650e17B69b0B524E. - “Implementation (address)”: Enter the address of the V3 implementation,
0xd9c3CE743B2A343bdBecD8aC1Ba0f0e709f3Dc3D. - “Data (bytes)”: Set to
0x, since we don’t need to call a method after upgrading.
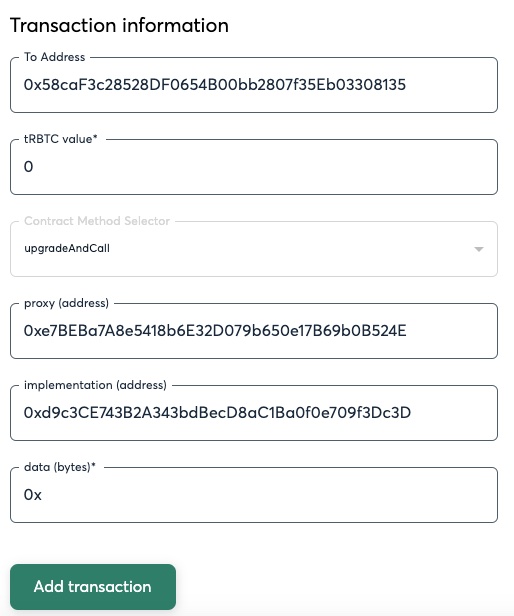
Once completed, click “Add transaction,” and the transaction will be added to the right-hand side. If we had additional transactions to batch, we could add them now. Since we don’t, click “Create Batch.”
Review and Sign the Transaction with the first signer
Review the transaction details, and sign the transaction:
Sign and Execute the Transaction with the Second Signer
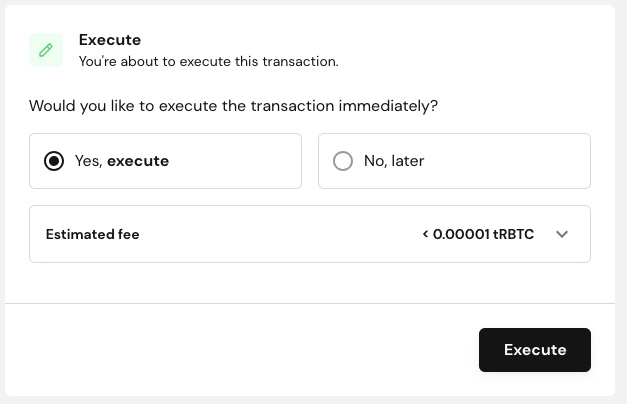
The Gnosis Safe we are using has two signers, so the second signer needs to log in to the Gnosis Safe, review, sign, and then execute the transaction. In the real implementation, we have several more signers required to make such changes.
We will connect our other signer to the Gnosis Safe app. In my case, it was a second MetaMask account. A message will appear indicating that a transaction is ready for my signature. Similar to the first step, I will sign the transaction. The only difference here is that it will also execute the transaction on the blockchain.
Verify the New Implementation
After the transaction is confirmed on the blockchain, we can verify the upgrade. In the block explorer, navigate to the Proxy Contract’s contract interaction tab and click on version:

Wrap-Up
In this post, we built upon the contract from the previous post, demonstrating how to delegate ownership of the ProxyAdmin contract to a Gnosis Safe. We deployed a new implementation contract (NumberKeeperV3) and used the Safe to upgrade the proxy contract to point to the new implementation. By leveraging a Gnosis Safe, we introduced a layer of decentralization and security, requiring multiple signers to approve significant changes, which mirrors real-world practices like those used by the Rootstock Collective DAO.
This process showed how to set up a Gnosis Safe, transfer ownership, and construct and execute transactions securely. Although some steps, such as creating and managing the Gnosis Safe or interacting with the Safe app, were simplified for brevity, they are critical for understanding the full upgrade workflow. These areas could be explored in greater depth in future posts if there is interest.
Thank you for following along! If you have questions or suggestions for future topics, feel free to reach out.
 20 Years of Dreamweaver, and One Long Overdue Migration
 AlertMe - Farcaster Reminder Bot
 A Developer's Guide to Storytelling
How to make your technical work matter to people who don't speak code