This blog has been built with Jekyll templates for about a month now, and I recently moved it over to Bitbucket and hosted with Digital Ocean. Since it moving away from GitHub for hosting, I can use custom plugins! GitHub limits the plugins they allow on their site for security reasons, which makes sense.
After searching around on the web, I couldn’t find a good hello world tutorial from start to finish, so I wrote this one. I’m new to Ruby, so I suspect this article may be pretty obvious to users who fully know Ruby.
_plugins folder
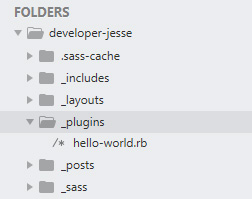
Create a _plugins folder off the root of your site to house your custom plugins.

Hello World Liquid Tag Plugin
In that folder, create a file called hello-world.rb and use the following code:
module Jekyll
  class HelloWorld < Liquid::Tag

    def initialize(tag_name, text, tokens)
      super
      @text = text
    end

    def render(context)
      "Hello World, #{@text}!"
    end
  end
end

Liquid::Template.register_tag('hello', Jekyll::HelloWorld)
- Line 2 defines our plugin,
HelloWorld, which inherits the class ofLiquid:Tag. - Line 4,
initializefunction is fired when the tag is seed on a page. It takes three parameters, thetag_name,text, which is the text of the item, andtokens. - Line 5 fires the parent’s (
Liquid:Tag)initializefunction. - Line 6 takes the local
textvariable and assigns it to@textwhich makes it accessible. - Line 9 is the
renderfunction and line 10 spits out our formatted text. - Line 15 registers the tag
helloand connects it to the Liquid tag that was created calledHelloWorld
Saying Hello
In a markdown file, include, or template, add the following code to say “Hello”:
{% hello Jesse %}
If you already have the bundler running, close it down and start it again with bundle exec jekyll serve. During the serve command, files in the _plugins folder are initialized.
Next, navigate to the page with the tag on it and in its place will be:
Hello World, Jesse !
Something Cooler
That was good in all but somewhat useless. I host a lot of the code samples with GitHub gists which are embeddable on a page. So, I expanded on the script above to quickly embed GitHub gists on a page.
module Jekyll
  class EmbedGist < Liquid::Tag

    def initialize(tag_name, url, tokens)
      super
      # remove spaces from string:
      @url = url.gsub!(/\s+/, '')
    end

    def render(context)
      "<script src=\"#{@url}.js\"></script>"
    end
  end
end

Liquid::Template.register_tag('gist', Jekyll::EmbedGist)
What is different here? Line 7 has been expanded to add .gsub!(/\s+/, '') which removes spaces, such as the trailing slash that was in the Hello World example above.
The output on line 11 is different as well as it wraps the URL with a <script> tag and adds the .js extension. To escape out the quotation marks, add forward slashes before them, \".
To use this plugin and embed a gist on a page, first copy the URL of a gist that you would like to embed. Then put the following on your page:
{% gist https://gist.github.com/jessgusclark/b119b502ad854212d7f3eea0e2b63e8b %}
The gist has been embedded on the page. The example above was the second gist on this page.